

*What you will need*
PaintShopPro (any version should work)
PaintShopPro (any version should work)
Font I used : Satisfaction
Cookie Tubes (C) WishingOnAStarr
Mura Meisters - Copies
My cluster frame *made from the kit*


**This tutorial assumes that you have working knowledge of Paint Shop Pro.**
**This tutorial was written by Aimee Pryor on September 5, 2010. Any similarity between
this tutorial and another is nothing but coincidence. You may link back to my tutorials, but do
not copy them and put them on your own group or site of any kind. If you'd like to share your creation, you may email them to me at tnt-aimee@live.com and I will share them here :o) Thanks!**
Open a new 700 x 700 pixel image.
Open my cluster frame - Copy and paste as
new layer. Using your selection tool - set to circle -
draw out a circle bigger than the inside of the frame..
as shown below:

Choose a paper from the kit - Resize 70% - Copy and paste
as new layer - Selections - Invert - Delete.
KEEP SELECTED!!
Now choose one of those beautiful cookie posers from the kit..
I chose the one sitting. If using her, then mirror - Copy
and paste as new layer. Make sure she's below the frame.
I moved her to the left, so that when done right... it looks like
her hand is on the frame, and she's sitting on the bottom of the frame
also. Duplicate and move the top cookie to the very top of
your tag image. Back to the bottom cookie layer - Hit delete.
Select none. Let's go back to the top cookie layer - Grab your
eraser tool (settings don't really matter).
Erase just the small part of her hand (leave the thumb alone).
Also erase the other hand, so that it looks like it's still
in the frame. Erase parts of her body where the deco is from the
frame. Looks pretty neat eh? :o)
Add a drop shadow to the bottom cookie layer.
Now all that's left is our mask and wordart!
Go to the very bottom layer of your tag image..
it should be raster1 - Select all - Choose a paper
from the kit - Copy and paste INTO selection.
Select none. Layer - New Mask Layer - From Image
and choose chasmask26 - Apply. Right click
in layer pallette and merge group.
Resize the mask by 90% - Duplicate - Mirror - Merge down.
You may need to move the mask over to the left, just a bit.
Ok. Now I liked this... but I wanted to add a little something
more. So. Add a new layer - Select all -
Choose another paper from the kit - Copy and paste
INTO selection. Select none. Layer - New Mask Layer - From Image
Choose chasmask28 - Apply. Right click in layer pallette
and merge group.
Before we finalize the tag... we're going to do something else.
Open a brand new 600 x 600 image.
Open gems3 (the black one) Copy and paste as new layer.
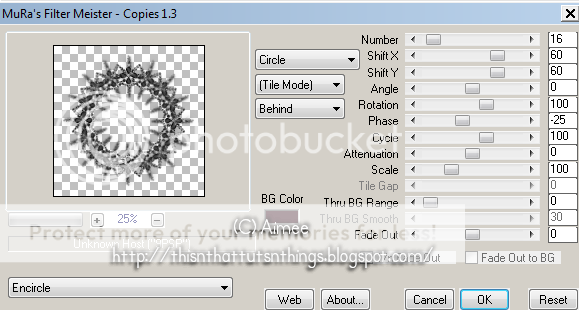
Now effects - Plugins - Mura Meister - Copies
with the settings below:
Apply and copy this new image - Go back to your tag
and above the second mask (right below the frame layer)
Paste as new layer. Resize 115%.
Ok. Merge visible. Crop opaque and resize to 500 x 500 pixels.
(or whatever size you'd like) Open my wordart - Resize
70% or so - Copy and paste as new layer. I put mine
on top of my tag... but of course, it's your choice.
Merge visible. Add your name and all copyright info.
Save as .png for a transparent background and .jpg for a white
background.
Thanks for stopping by and giving my tut a try!! :o)

No comments:
Post a Comment
Hey there! Why don't you leave a little something before you go :o)