
*What you will need*
PaintShopPro (any version should work)
PTU Kit "FallEverFriends" by Bello Scarto
Font I used : Ballantines-Light
Tubes © Jane Anderson

**This tutorial assumes that you have working knowledge of Paint Shop Pro.**
**This tutorial was written by Aimee Pryor on September 7, 2010. Any similarity between
this tutorial and another is nothing but coincidence. You may link back to my tutorials, but do
not copy them and put them on your own group or site of any kind. If you'd like to share your creation, you may email them to me at tnt-aimee@live.com and I will share them here :o) Thanks!**
Ready?!
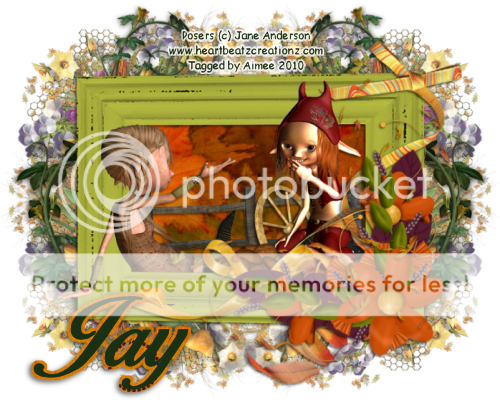
Open a new 700 x 700 image. Also open my cluster frame -
Copy and paste as new layer onto your new image.
Using your selection tool set to rectangle, draw out a rectangle
just a little bigger than the inside part of the frame.
Choose a paper from the kit - Resize 70% - Copy and paste
as new layer. Selections - Invert - Delete. KEEP SELECTED.
Copy the tube of the girls sitting - No need to resize -
Paste as new layer onto your tag image. Place where
you'd like - Then duplicate. Move the duplicate layer
all the way to the top. Keep the original under the frame - Hit
delete. Select none. Add a drop shadow of 2, -2, 60, 5 - Black.
Make the duplicate tube layer active - Using your eraser tool,
erase parts of the girls that show beyond the frame.
Their bottoms, parts of their arms, etc. Look at my tag
if needed.
Here are a couple elements I threw into the frame with the girls.
Element 19 - Resized 40% - Placed above the (original) girls tube,
below the frame. Drop shadow.
Element 21 (wheel) - Resized 30% - Place below the original girls
tube - right behind the one in red. Drop shadow.
Element - Resized 50% - Placed above the background frame layer
and just below the wheel. Drop shadow.
X Out your bottom layer - Merge visible.
Resize your merged layer only - to 90%
(make sure all layers is unchecked)
Un X the bottom layer and make active.
Open element 7 - Resize 85% - Copy and paste
as new layer. Place onto the right top corner of the image.
Duplicate - Mirror - Merge down - Duplicate - Mirror - Flip -
Merge down. Now move this layer below the merged
tag layer. Lower the opacity to about 80%.
Now open up element 13 - Resize 85% - Copy and paste
as new layer onto the left side of the tag, below the frame
layer. Duplicate - Mirror. Drop shadow.
Merge visible. Crop opaque - resize to your liking.
Add your name and all copyright info.
Save as .png for a transparent background and .jpg
for a white background.
I hope I didn't confuse you too much.
Thanks for stopping by and trying my tut out.

Hi Aimee :) I am so very flattered that you used my FantasyLand kit @ Creative-Disorder for a tut & so happy to get a tag lol. Sorry for late reply, have been moving...
ReplyDeleteYou may send tag to Muriel79 @ gmail (dot)com
I wrote it like that just in case of spammers lol. I checked out tut, beautiful!!! Thanks so much :)