

*What you will need*
PaintShopPro (any version should work)
PTU Kit "Sapphires In September" by Crys @ Creative Scraps By Crys
Filter - Jeau De Lignes - Entrelacement
Tubes © Medi
Mask from Creative Misfits Creations
(You'll have to search for it, as I don't remember the exact page.
The theme was "diamonds".)
Font : Satisfaction

(Please leave a "Thank you" here for the downloads!)

**This tutorial assumes that you have working knowledge of Paint Shop Pro.**
**This tutorial was written by Aimee Pryor on September 16, 2011.
Any similarity between this tutorial and another is nothing but
coincidence. You may link back to my tutorials, but do not copy
them and put them on your own group or site of any kind.
If you'd like to share your creation,
you may email them to me at tnt-aimee@live.com and
I will share them here :o) Thanks!**
Download and open Frame in PSP
Download and open word art in PSP
Download and open mask in PSP
Minimize word art and mask for later use.
Duplicate the frame and close out original.
Using your magic wand, click inside the frame -
Selections - modify - Expand by 6
Choose a paper from the kit - Open and Copy - Paste as new layer
Selections - Invert - Delete.
Move the paper below the frame layer.
Select all - selections float - Defloat
Copy tube of choice -
Paste as new layer - Selections - Invert - Delete.
Select none. Duplicate tube.
Top tube layer Change Blend mode to Screen
Merge the two tube layers together.
Apply drop shadow of choice.
I used : 2, 2, 80, 10 - Black
Go back to the layer just under the frame (the background layer)
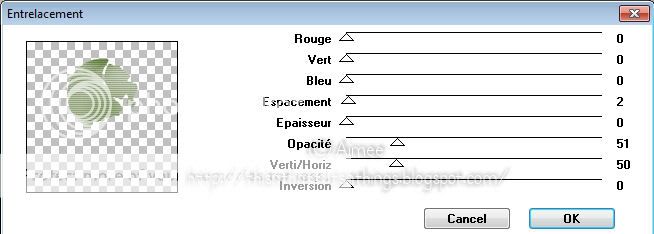
Apply Jeau De Lignes filter - Entrelacement
with following settings :
Just about done!!
Now let's change the Canvas size to 675 pixels x 675 pixels
So we have room to add our simple wordart.
Copy word art and past as new layer.
I placed mine on the frame where the empty part is.
I applied a drop shadow of 2, 2, 60, 5 - Black to the word
art.
Now merge layers visible.
Our last step is to add our mask and name.
Open the mask in your PSP and minimize.
Choose a paper, copy.
Go back to image and add new layer - Select all -
Paste INTO selection.
Select none.
Layers - New layer from image.
Choose chasmask30
Apply. Merge group and resize 80%
Arrange to your liking. Merge visible.
Add name - I used Satisfaction - Size 72
Apply a drop shadow of choice to the name.
Add all copyright info - Merge visible.
Crop to your liking - resize and save.
Save as .png for a transparent background and .jpg for a white
background. Hope you enjoyed the tut, I'd love to see what anyone comes
up with using my tut!!
I hope you enjoyed this tut and it wasn't too confusing to you!!
Thanks :o)

**With this kit, I also made my mother a birthday greeting (her bday is September 20th)
The possibilities are endless!!

No comments:
Post a Comment
Hey there! Why don't you leave a little something before you go :o)