
**What you'll need**
Jasc Paint Shop Pro (any version should work)
PTU Kit "Enchanted" by Crys
DiamondsbyTonyaMask1 - CreativeMisfitsCreations
Font: A & S Snapper Script
**This tutorial assumes that you have working knowledge of Paint Shop Pro.**
**This tutorial was written by Aimee Pryor on August 29, 2010. Any similarity between this tutorial and another is nothing but coincidence. You may link back to my tutorials, but do not copy them and put them on your own group or site of any kind. If you'd like to share your creation, you may email them to me at tnt-aimee@live.com and I will share them here :o) Thanks!**
Let's start! Shall we?
First make sure you've got your filter and font installed.
Open the mask in your PSP and minimize for now.
Ok. Here we go! Start by opening a new 700 x 700 pixel image.
I know it's large, but we'll need the space to work with.
Open the frames folder in the kit, choose one of the rectangle frames.
Rotate the frame Right - Clockwise - Copy and paste as new layer
onto your image. Using your magic wand (feather and tolerance set to 0)
click inside the frame. Selections - Modify - Expand by 3.
Choose a paper from the kit - Resize 70% - Copy
and paste as new layer - Selections - Invert - Delete. KEEP SELECTED!!
Now we're going to add a whole bunch of goodies to the inside
of the frame. Keep selected until I tell ya' we're done.
(not trying to sound too demanding...lol)
I'll list for you, the items I used and what I did.
Please note... Instead of repeating constantly.... when you place
the elements, if they go beyond the frame, remember to hit
delete before moving onto the next element.
Shoe House - Resized 70% - Moved to top center
Tree - Resized 50% - Moved to right of tag
Sun - Resized 50% - Moved to left of tag
Blue Mushroom - Resized 30%
Purple Mushroom - Resized 30%
Pink Mushroom - Resized 35%
Hill - No resize needed
Grass - Resized 20% - Duplicated 3 times and arranged
Birdhouse - Resized 50%
Bird - Resized 15% (Placed on pot at bottom of birdhouse)
Fence - Resized 50% - Duplicate and Arrange
Make sure to arrange all those elements to your liking.
Once satisfied, select none. Apply a drop shadow of 2, -2, 50, 8 - Black
to each of those element layers. Also give the frame the same
drop shadow.
X out the bottom raster layer - Merge visible. Now we won't get too confused
with the layers. :o) I used a couple more elements above
the frame, which I'll list for you now.
Flowers - 35%
Dragonfly - 20%
Lizard - (He's so cute!!) 40%
Drop shadow each of those layers.
Now choose one of the cookie posers from the kit.
Resize her at 60% - Copy and paste as new layer.
I put mine to the left of the lizard and just below.
(Move the tube layer below the lizard layer).
Give her the same drop shadow we've been using.
Merge visible. (Your bottom raster should still be X'd out)
Alrighty. Now let's dress up the backside of the tag!! :o)
Grab the color splatter from the kit, no need to resize -
Copy and paste as new layer - Arrange to the bottom right of
the tag, Duplicate - Mirror - Flip - Merge down.
Move this layer just above the X'd out raster.
Now let's take the green bead spill - No need to resize -
Copy and paste as new layer. Move to the bottom right of the
tag - Duplicate - Mirror - Flip - Merge down.
Lower the opacity to about 70%.
Effects - Plugins - DSB Flux - Bright Noise
Intensity set to 30 - Mix checked.
Apply and repeat once.
One more element to add!! Open the swirl from
the kit - Resize 20% - Copy and paste as new layer.
Move it to the bottom left of the tag, on the frame
corner. Duplicate - Mirror - Flip - Merge down and apply
drop shadow. Phew!!
Make sure the bottom layer is still X'd out. Merge visible.
Resize image to 500 x 500 pixels. *All layers unchecked*
Now let's do the mask!!
UN X the bottom layer and make it active - Select all -
Choose a paper from the kit - Copy and Past INTO selection.
Select none. Layer - New Mask Layer - From Image -
Scroll until you see "DiamondsbyTonyaMask1"
Apply. Merge group. Duplicate - Merge visible.
Crop and resize if needed.
Now add your name and all copyright info.
Save your tag as .png for a transparent background
or .jpg for a white one.
Thanks for tutting with me! Hope I didn't confuse you!!

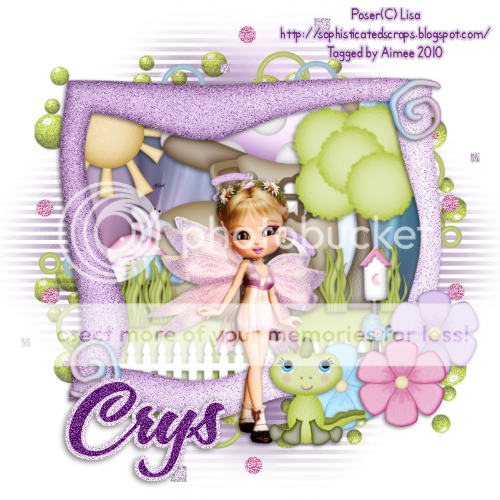
**I also made this cluster frame with the kit.
The frame is a freebie... personal use ONLY!! And you can
download it HERE.**

No comments:
Post a Comment
Hey there! Why don't you leave a little something before you go :o)