
**What you'll need**
Jasc Paint Shop Pro (Any version should work)
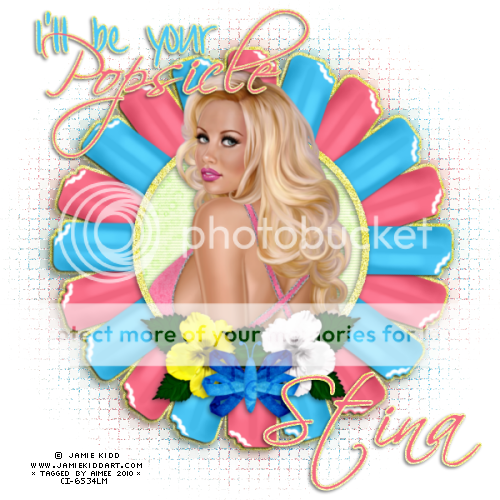
PTU Kit "Seasons In The Sun" by Stina
Mura Meister's Cloud and Copies
and Penta.com's VTR2 all can be found HERE
My word art, you can get here
Font used : Scriptina
Tube (C) Jamie Kidd
You MUST acquire a license from CILM in order to use
the tube.
**This tutorial assumes that you have working knowledge of Paint Shop Pro.**
**This tutorial was written by Aimee Pryor on July 5, 2010. Any similarity between
this tutorial and another is nothing but coincidence. You may link back to my tutorials, but do
not copy them and put them on your own group or site of any kind. If you'd like to share your creation, you may email them to me at acpryor@live.com and I will share them here :o) Thanks!**
Ready?! Let's do this!!
Let me start by saying this may look difficult, but it's really not...
Okie dokie. Open a new 600 x 600 pixel image.
Choose one of the popsicles from the kit.
Whatever color you'd like to use, could be the same or not... your choice!
Resize the popsicle by 30%. Copy and paste as new layer.
Effects - Plugins - Mura Meister Copies.
With the settings below:

Apply. Now choose another popsicle from the kit,
resize the same as before. Copy and paste as a new layer.
Mura meister copies with the same settings as before.
Apply. Now using your deform tool, slightly turn the top
layer of popsicles to the right or left, filling in the empty
space of the bottom popsicle layer. Look at my tag, if you need
to. When satisfied, apply. Add a drop shadow of 2, -2, 50, 4 - Black
to each of the popsicle frame layers.
Easy peasy so far!!
Okie dokie. Let's grab our selection tool, set to circle,
and draw out a circle selection that reaches just a little beyond the
popsicle sticks. If I've just confused you.... look at my sample image
below.

Choose a paper from the kit, resized 70% - Copy and paste
as new layer onto your image. Selections - Invert - Delete - Invert
Modify - Contract by 10 - Delete. Select none. Adjust - Noise -
Gaussian 50%. Using your magic wand, click inside the frame area -
Selections - Modify - Expand by 2. Choose another paper from
the kit - Resized 70% - Copy and paste as new layer. Selections -
Invert - Delete. Keep selected!! Move this layer below the frame layer.
Apply VTR2 to the paper layer with the settings below:

Now let's grab our main tube! If using the same one that
I have used, resize her by 60% - Copy and paste as new layer.
Arrange to your liking... then delete. Select none.
Make your frame layer active - Re paste the same tube and line
up with the bottom tube layer. Using your eraser,
erase all the parts of her that show beyond the bottom of the frame layer.
Apply the same drop shadow we used before on the bottom tube
layer. Also add that same shadow to the frame layer.
X out the bottom layer and merge visible.
Here's a list of the few elements I used:
DBS_Hibiscus02 - Resized 30%
DBS_Hibiscus04 - Resized 30%
(arrange both of those to your liking)
DBS_FoldedButterfly01 - Resized 25%
(place in center of the two flowers)
Add the drop shadow we used before to each of
those layers. Merge visible.
Alrighty. Choose another paper from the kit,
no need to resize, unless you'd like to.
Back to your image....select all - Float - Defloat
Selections - Modify by 2 - Copy and paste the paper
as a new layer. Apply the same noise as before.
Select none. Add same drop shadow as before.
Merge the image visible. Duplicate. Change your canvas
size to 650 x 650 pixels to allow us some room.
On the bottom image layer - Adjust - Blur - Gaussian
set to 10. Effects - Texture effects - Mosaic Antique
with the settings below:

Apply. Resize the image to your liking,
add wordart, your name and all copyright information.
Save as .png for transparent background or .jpg for a white background.
I hope you enjoyed this tut and it wasn't too confusing to you!!
Thanks :o)

No comments:
Post a Comment
Hey there! Why don't you leave a little something before you go :o)