Tuesday, September 20, 2011

"Rockin' It" FTU Tut


*What you will need*

PaintShopPro (any version should work)
FTU Kit "Rockin It" by Crys  @ Creative Scraps By Crys
Font I used : Azariel Demo
Tube © Sinful Mindz

**This tutorial assumes that you have working knowledge of Paint Shop Pro.**

**This tutorial was written by Aimee Pryor on September 20, 2011.  
Any similarity between this tutorial and another is nothing but 
coincidence.  You may link back to my tutorials, but do
not copy them and put them on your own group or site of any kind.  
If you'd like to share your creation,
you may email them to me at tnt-aimee@live.com and I will 
share them here :o) Thanks!**

Alrighty!  Ready to do this?? Let's go!  This tut is quite easy...
Download and open my cluster frame - Also make sure to
install your font.  Open the kit, so you have easy access to it.

Using your freehand selection tool ( looks like a lasso) Feather set to 0 - Trace
around the frame.  Don't get too close to the edge though!  Choose a paper from
the kit - Resize 70% - Copy and paste as new layer.  Move the paper
below the frame layer.   Select none.

Choose a tube from the kit - Copy and paste as new layer.
She should be below the frame layer - It's ok, leave her there!!
Arrange the tube to your liking and then
Duplicate the tube and move the copy above the frame layer.
Hide the top tube layer for the moment.  Let's go back to the
frame background layer - Select all - float - defloat - Invert -
Now make the bottom tube layer active and hit delete.  Select none.
Apply a drop shadow of 2, -2, 80, 6 - Black.
Make the top tube layer active - using your eraser - erase
the bottom parts of her dress.  Merge visible.

Open yellow bricks, resize 80% - copy & Paste as a new layer  - arrange
to the top left of the tag - Open the blue brick - Resize 80% - Copy and paste
as a new layer - Arrange to the bottom right of tag.  Hide all
other layers and merge visible.  Duplicate this layer and flip - Merge
together - Apply drop shadow used earlier - Resize 85% (make sure
all layers is NOT checked).  Move layer below the image if you
haven't already.

Unhide all other layers & Merge visible.
Change the canvas size to 700 x 700 Pixels.
Open one of the star mesh elements - Resize 85% - Copy and paste
as a new layer.  Adjust Hue, Saturation & Lightness with 
the settings below :


Add a new layer - Select all - Choose paper from the kit - Copy
and paste INTO selection -  Select none.  Apply a mask
of your choice.  After applying mask - merge group.

Now let's open the "Rockin It" word art from the kit - 
Resize 70% - Copy and paste as a new layer - Arrange
to your liking.... Apply same shadow as before.
Merge visible.  Crop & Resize to your liking.
Add all copyright info and your name.

Save as .png for a transparent background and
.jpg for a white background.
DONE!!!

I hope you enjoyed this tut and it wasn't too confusing to you!!
Thanks :o)


****I also made a second frame using this kit... you're welcome 
to download it, just please leave me a thank you!!****


Monday, September 19, 2011

"Pixie Attitude" PTU Tut

*What you will need*

PaintShopPro (any version should work)
PTU Kit "Pixie Attitude" by Crys  @  Creative Scraps By Crys
Font I used : Scriptina
Tube © Medi


**This tutorial assumes that you have working knowledge of Paint Shop Pro.**

**This tutorial was written by Aimee Pryor on September 19, 2011.  
Any similarity between this tutorial and another is nothing but 
coincidence.  You may link back to my tutorials, but do
not copy them and put them on your own group or site of any kind.  
If you'd like to share your creation,
you may email them to me at tnt-aimee@live.com and I 
will share them here :o) Thanks!**

Alrighty!  Download and open the template in PSP & Install your font.
Duplicate the template - Close the original.

Activate the top square layer using your magic wand.
Select inside the square and then go to selections - modify 
Expand by 1.  Add a new layer - Copy a paper from
the kit and paste into selection.  Select none.
Do the same for the bottom square.  Delete the Original 
SMALL SQUARES layer.

Make FRAME layer active.
Selections - Select all - Float - Defloat
Choose another paper from kit - Copy and paste
as a new layer.  Selections - Invert - Delete.
Select none.  Delete original FRAME layer.

Activate FRAME BACKGROUND layer - Selections
Select all - Float - defloat - Choose a paper from the kit,
resize 70% - Copy and paste as a new layer - Selections -
Invert - Delete.  Now delete the original FRAME BACKGROUND
layer.

Now make the dots active - Select all - Float - Defloat
Choose a coordinating color - Add a new layer -
and fill with color.  Select none and delete the original DOTS
layer.

We've finished with the base of our tage.  Now's a good time
to grab a snack, maybe a drink, and come back!  Now is also
a good time to save your image (as a PSP image) in case
something happens.

Ready?!  Here we go --

Change your canvas size to 750 x 750 pixels so we
have room to work.  Make Raster 2 layer active (bottom 
square) -  Add some elements.  Here's what I added
and how I resized them :
House - 30%
Log - 15%
Frog - 15%
Chair - 15%
Mushrooms - 10%

Apply a drop shadow of 2, -2, 70, 8 Black to each of the element layers.
Hide all other layers and merge visible.
Unhide all layers and make the top square layer active.
These are the elements I used and how I resized :
Flowers - 60%
Tree - 40%
Bird - 20% (& mirrored)
Apply the same drop shadow we used before.
If any elements go beyond the paper - make paper layer
active - select all - float - defloat - Invert - then click on
each element layer and hit delete.  Select none.  Hide all other
layers - Merge visible.

Make frame background active - Copy tube of choice.
Paste as new layer (will be below the frame).
Duplicate and move copied tube above the frame layer.
Make frame background active - select all - float - defloat
Invert - Make bottom tube layer active and hit delete.
Select none.  Now activate the top tube layer - 
Using your eraser - erase her feet.  Add previous drop
shadow to the frame layer.  Hide all other layers and merge
visible.  Add the same shadow to the two smaller squares.
Merge all visible.

Copy leaf element # 23 from kit - Paste as new layer.
Arrange to your liking - Make sure it's under the main
image - Duplicate - Mirror - Flip.  Merge visible.

Add a new layer - Select all - Choose and copy a paper 
from the kit - Paste paper into selection.  Select none.
Now apply a mask of your choice.
Merge visible - Crop and resize to your liking.

Copy "Pixie Attitude" wordart - Paste as new layer - Resize
70% (just the word art).
Add name and copyright info.
Save as .png for a transparent background and .jpg
for a white background.

You're done!!
I hope you enjoyed this tut and it wasn't too confusing to you!!

Thanks :o)


****I also created a couple cluster frames using this kit.
They are free for you to download, just remember to leave
me some thank yous!!****


Saturday, September 17, 2011

Freebie Cluster Frames!!

Made these purty cluster frames using
"Letters From Home" by Crys.

She creates some gorgeous kits!!!  Ya'll are welcome
to grab these... however... please come back here and leave me some love!!

Thanks and Enjoy!

Frame 1 - Download


Frame 2 - Download


Frame 3 - Download


Friday, September 16, 2011

"I Thank You" PTU Tut


*What you will need*

PaintShopPro (any version should work)
Font I used : Suave Script
Tube © Igolochka


**This tutorial assumes that you have working knowledge of Paint Shop Pro.**

**This tutorial was written by Aimee Pryor on September 16, 2011.  
Any similarity between this tutorial and another is nothing but 
coincidence.  You may link back to my tutorials, but do
not copy them and put them on your own group or site of any kind.  
If you'd like to share your creation, you may email them to me at 
tnt-aimee@live.com and I will share them here :o) Thanks!**

First things first...
Let's open the frame, my wordart (if using), download and install your font.
Minimize the word art for now, Duplicate the frame - Close out original.

Using your magic wand tool - click inside the frame.
Selections - Modify - Expand by 10
Choose a paper from the kit and copy.  Then paste as new layer.
Invert - Delete.  Select none.  Move below frame layer.

Make sure your frame layer is active - 
Copy the tube you're using, paste as new layer.
Duplicate the tube layer and move below the frame layer.
If using the same tube (or another large tube), make your
paper layer active - Select all - Float - Defloat
Invert - Make the tube layer active - Delete.
Now let's go back to the top tube layer...
Using your eraser tool, erase the bottom parts of the
tube that show on the frame.  Look at my example
below to understand what I mean.
Now merge visible.  Change canvas size to 700 x 700 pixels.
Copy and paste my wordart onto the left side of the frame.
(or use another wordart of your choosing from the kit)
Merge visible.

Resize to your liking.
Add all copyright info and name.

Save as .png for a transparent background, .jpg for a white
background.
Now THAT was easy!!  Wasn't it?! 
I hope you enjoyed this tut and it wasn't too confusing to you!!

Thanks :o)


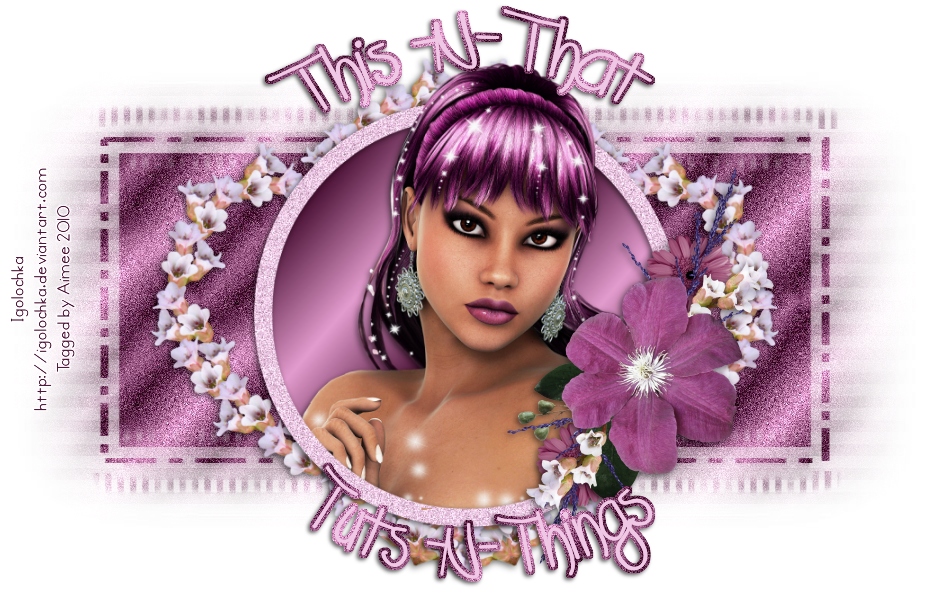
"Beautiful" - PTU Tut


*What you will need*

PaintShopPro (any version should work)
Tubes © Medi
(You'll have to search for it, as I don't remember the exact page.
The theme was "diamonds".)
Font :  Satisfaction
(Please leave a "Thank you" here for the downloads!)


**This tutorial assumes that you have working knowledge of Paint Shop Pro.**

**This tutorial was written by Aimee Pryor on September 16, 2011.  
Any similarity between this tutorial and another is nothing but 
coincidence.  You may link back to my tutorials, but do not copy 
them and put them on  your own group or site of any kind.  
If you'd like to share your creation,
you may email them to me at tnt-aimee@live.com and 
I will share them here :o) Thanks!**

Download and open Frame in PSP
Download and open word art in PSP
Download and open mask in PSP
Minimize word art and mask for later use.

Duplicate the frame and close out original.
Using your magic wand, click inside the frame -
Selections - modify - Expand by 6
Choose a paper from the kit - Open and Copy - Paste as new layer
Selections - Invert - Delete.

Move the paper below the frame layer.
Select all - selections float - Defloat

Copy tube of choice -
Paste as new layer - Selections - Invert - Delete.
Select none.  Duplicate tube.
Top tube layer Change Blend mode to Screen
Merge the two tube layers together.

Apply drop shadow of choice.
I used : 2, 2, 80, 10 - Black

Go back to the layer just under the frame (the background layer)
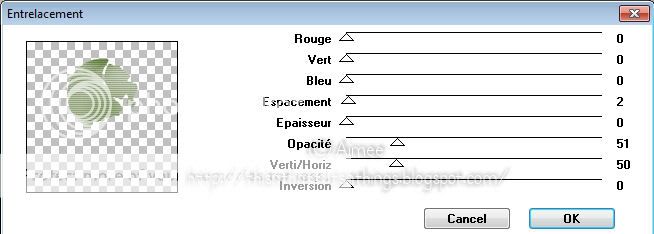
Apply Jeau De Lignes filter - Entrelacement
with following settings :


Just about done!!
Now let's change the Canvas size to 675 pixels x 675 pixels
So we have room to add our simple wordart.
Copy word art and past as new layer.
I placed mine on the frame where the empty part is.
I applied a drop shadow of 2, 2, 60, 5 - Black to the word
art.

Now merge layers visible.
Our last step is to add our mask and name.

Open the mask in your PSP and minimize.
Choose a paper, copy.
Go back to image and add new layer - Select all -
Paste INTO selection.
Select none.

Layers - New layer from image.
Choose chasmask30
Apply.  Merge group and resize 80%
Arrange to your liking.  Merge visible.

Add name - I used Satisfaction - Size 72
Apply a drop shadow of choice to the name.
Add all copyright info - Merge visible.
Crop to your liking - resize and save.

Save as .png for a transparent background and .jpg for a white
background.  Hope you enjoyed the tut, I'd love to see what anyone comes
up with using my tut!!  

I hope you enjoyed this tut and it wasn't too confusing to you!!

Thanks :o)


**With this kit, I also made my mother a birthday greeting  (her bday is September 20th)
  The possibilities are endless!!


Monday, January 24, 2011

"Hard Candy" PTU Tut

**What you will need**

PTU Kit "Hard Candy" by Stina
Mura Meister - Copies
DSB Flux - Bright Noise
Font of choice 

Ready?

Open a New image - 600 x 600 pixels.
Open DBS_Frame02 - Resize 70%
Move to the left side of the canvas.

Using magic wand - Select inside of frame
Modify - expand by 3
New layer - Flood fill with silver gradient of choice.
I have one listed as "grey" in my PSP... however... I don't
remember if it's a default of PSP or one I made.
Edit it a little if you like... I repeated mine 3 times and
used a 45 degree angle.
Selections - None.
Move the gradient layer below the frame layer.
Lower opacity to 80% Make frame layer active.

Open DBS_ciz_candy_2 (unless you want to use
another one) Resize 80% Copy and paste as new layer.
Move to the right of the frame. Duplicate and mirror.
Make gradient layer active - Select all - Float - defloat.
Selections - Invert - Make mirrored tube layer active
and hit delete. Move the tube under the frame layer.

Lower opacity to about 70%.
Apply a drop shadow of 2, -2, 70, 8 Black to the frame layer.
Add the same drop shadow to both tube layers.
Hide the full tube layer. Merge visible the Mirrored
tube, the gradient layer, and the frame layer.
Unhide the other tube layer.

Open DBS_LacedUpHeart01 - Resize 30%
Copy and paste as new layer.
Mura Meister Copies - With settings below.


Move hearts layer to bottom.
Using magic wand - select inside hearts - selections
modify - expand by 3
Choose a paper from the kit - Resize by 60% - Copy
and paste as new layer - Selections - Invert - Delete.
Select none. Move paper layer below hearts layer -
Apply drop shadow used before to hearts layer.
Make top layer active.

Open DBS_Bow05 Resize 30% Copy and paste as new
layer. Move onto the frame at the stand. Look at my tag
for placement if needed. Grab some of the heart conversation
candies, you'll need 3. Resize each at 25% - Copy and paste
as new layer. Move them under the tube layer and arrange
to your liking. Look at my tag for placement if needed.
Apply same drop shadow as before to each candy heart.
Make the paper layer (inside the hearts) active -
Select all - Float - Defloat
Open one of the glitters from the kit, Resize 70%.
Copy and paste as new layer - Selections - Invert - Delete.
Select none. Just about done!!!

Merge all layers together, EXCEPT the glitter, hearts, and paper
layer. Hide the merged image. Now you should just be seeing
the hearts, paper, and glitter. Merge those layers visible.
Resize all layers to 500 x 500 Pixels.
Then go to image - canvas size - and change to 600 x 600.
Duplicate hearts layer. Make the bottom hearts layer active.
Now adjust - Blur - Gaussian Blur - 25
Apply DSB Flux with the settings below


Repeat 3 more times.
Merge visible - Resize to your liking.
Add name and all copyright info.
Save tag as .jpg for a white background and .png
for a transparent background.

Thanks for giving my tut a try! I hope you enjoyed it
and I didn't confuse you too much!!


Here's another tag I made using the same kit.
The possibilities are endless!!


I also made a cluster frame with this kit!


Saturday, January 1, 2011

HAPPY NEW YEAR!!!!


Here's to the past year.... To the blessings, to the sadness,
the heartaches, to the mistakes, the hard work, the fun times...

Without all those things happening, we wouldn't be
where we are right now.

Now's the time to look to the new year and the changes
we may choose to make.

Here's to friends old and new and to the families we love
and those we have lost.

Here's to those soldiers who are still doing their very best
to fight for what's right.

Here's to the Lord, all things are made possible through Him!!
I hope that you all have
a blessed new beginning for 2011!!!

Love and Blessings!!

Friday, December 31, 2010

Merry Christmas - PTU


*What you will need*

PaintShopPro (any version should work)
PTU Kit "Christmas Glitz" by Heartfelt Perfections
Font I used : Satisfaction
Mask of choiceTubes © RomiPoser
MC Cluster Frame by Aimee (Me)
MC Wordart by Aimee

**This tutorial assumes that you have working knowledge of Paint Shop Pro.**

**This tutorial was written by Aimee Pryor on December 31, 2010.  Any similarity between
this tutorial and another is nothing but coincidence. You may link back to my tutorials,
but do not copy them and put them on your own group or site of any kind.
 If you'd like to share your creation,
you may email them to me at tnt-aimee@live.com and I will
share them here :o) Thanks!**

Ready?!
Gather all your materials first.... Font, Mask of choice
(sorry...I don't remember
who I got the mask I used from), tube, scrapkit,
wordart, cluster frame.

Open MC Cluster Frame in psp.
Shift D to duplicate, close the original.
Resize canvas to 800 x 800 pix.

Using selection - rectangle, make a rectangle just bigger
than inside of frame.

Choose paper from the kit, I colored mine red.
Resize 50% - 3times. Copy and paste as new layer.
Selections - Invert - Delete. Select none.
Move the paper below the frame layer.
Select all - Float - Defloat


Resize tube to your liking. Copy and paste as
new layer. Move her just so she
is slightly in the frame. Duplicate the layer.
Move one of the tube layers above the frame layer.
The other tube layer should be just above the paper.
The tube layer that is just above the paper needs to be active.
Selections - Invert - Delete. Select none.

Go back to the top tube layer. Using your eraser tool,
erase the bits of her legs that show on the frame, also part
of her skirt.. Look at my tag for reference.
Apply a drop shadow of 2, -2, 80, 8 Black to the bottom tube
layer.


Merge visible.


Elements - Tree - Resize 40%, then 80%
Move frame down just a little - Copy the tree, paste as new layer.
Move below the frame layer and to the left side. Duplicate - Mirror.
Merge the two together and apply same drop shadow as before.


Open flowers - Resize 40%, then 80%
Copy and paste as new layer - Move below tree layer.
Center between the two trees.
Apply same drop shadow as before.


Make frame layer active.
Open silver reindeer. Resize 30% then 70% - Copy and paste
as new layer. Move to the right of the tag, apply same drop shadow.
Merge visible.


Resize 500 x 500 pixels.
Canvas size 600 x 600 pix.
Add new layer - Move below merged layer.
Select all. Choose a paper from the kit
and paste INTO selection. Select none.


Layer -New mask layer - from image
Scroll until you find the mask you're using.  Depending
on the mask, you may need to resize.
Apply and merge group.
Drop shadow 2, -2, 60, 8 - Black.

Merge visible.


Open my wordart - Copy and paste as new layer.
move to bottom left of tag. See my tag for placement.
Merge visible - Resize all layers to your liking.
Add name and all copyright info.


Save as .jpg for a white background or
.png for a transparent background.

I hope you enjoyed this tut and it wasn't too confusing to you!!

Thanks :o)


**Here's a bonus cluster frame I made with this kit.
Feel free to grab it too, if you'd like!** 
 
Download